Friday, April 6, 2018

Boost your Career with 3Ds Max Training from Best Institute in Delhi


If you are working in architectural and interior designing industry or want ot go for it then having knowledge of 3ds Max would be an added advantage for you. Without an understanding of Max you can’t create your profile as an professional architect. Having knowledge of Auto CAD, Revit and Google Sketch UP isn’t sufficient in current scenario. You need to polish you skills with this versatile 3d graphics software. Now if you have any doubt regarding the this software then this blog is completely for you. 

This blog will tell about Autodesk 3Ds Max which is a well- known to everyone who is interested to create virtual and realistic models along this you’ll find many essential pace which you must know before moving for learning this software. 

Essential Understanding on 3Ds Max

Being a 3D computer graphics software 3Ds Max is used for creating 3d animation, models, objects etc. Any movie or video in which all or some of the objects are virtual which do not exist in real world and an entire interior of any plan. So we can say that if one is creative and deploy all the things as model whether it is virtual or realistic then this is the best software for them. The demand for 3d modeling, with lighting and texting is enlarging day by day in the market.


Some popular Features of 3Ds Max
  • Character Studio Integrated 
  • Allow linking and import the DWG files
  •  3D Modeling, Texturing, and Effects
  • General Key Framing
  • Scene Explorer 
  • Constrained Animation and many more 

Why join our ADMEC Multimedia Institute 

The best Institute for 3Ds Max training is ADMEC in Delhi. There are many reasons to prove this statement true. Let you know the facts which makes our Institute best for 3Ds Max classes in Delhi.
  • Industry experts teachers who have working experience furnishes the industry relevant training with live projects.
  • We give you the personal attention because there are only 4-5 students in a batch.
  • We help you in finding a platform where you can start your career.
  • Location of our institute is suitable because it is nearby metro station.
  • We have high-tech lab with non stop wi-fi facility where students can practice and take immediate guidance of our professionals.
  • With proper guidance, we also issue complete study material to the students that provide ease to them during the course.
Many more reasons are there to join our institute. To be confident in cracking any interview with a good and vast knowledge you really need essential guidance. Check out the below given Autodesk 3ds Max course offered by our center.

3Ds Max Master course

Time Period: 3 months
This course is a complete certificate course which consist the hard core teaching of 3d modelling, lighting, texturing, and rendering. This is an ideal course for those who want to excel in architectural & interior designing.. This program will provide a comprehensive knowledge of this versatile software.

Prerequisites for 3Ds Max Training

Any individual which have knowledge of Adobe Photoshop and technical drafting is eligible for this course.

Go through our 3ds Max course to know more.

Career Opportunities

There are a lot of career prospects for an individual after learning 3ds max. Some of the opportunities are:
  • Autodesk 3D Max Specialist
  • 3D Artist
  • Art Director
  • 3D Modeller Professional
  • Texture Artist
  • Lighting Professional
  • Rigging Expert
  • 3D Animators
  • Architects, Interior Designers etc.
Learning 3Ds Max can really boost your career if you have got command on this software. So go for training without wasting your time anymore. For more details you can visit ADMEC Multimedia Institute or you can contact us 99 1178 2350, 98 1181 8122 .


Saturday, February 24, 2018

Benefits of Learning Advanced Revit Course from Best Training Institute


Hello, Are you thinking to learn the Revit course and have some confusion that is it beneficial for you or not and which is a right place to learn Revit then your search ends here because I will answer all of your questions through this blog. So Let,s start with a brief introduction of Revit.

Introduction of Revit
It is a software developed by Autodesk which is used to provides user-friendly design environment and faster construction of buildings in documents. It will introduce you to different concepts and principles starting from Building Information Modeling (BIM) to construction documentation.

Why you should choose Revit?
  • Unlimited scope of career because each day a new building is there and before construction of the building, a model should be approved and that model can be created by you in this amazing architectural software.
  • Very Necessary for Architecture background students to stay in the market without any problem.
  • Knowledge of this software can boost one's career in Architectural Designing.
Benefits of Learning Revit Course

There are many benefits of learning Revit. After completing the course you will able to do as follows:-
  • You can use Vast Library of Parametric Building Components which facilitate to make a model of building in a short time without much more complexity.
  • By using this software you can make high-quality construction documents which contribute to making a perfect model and you will be presenting a good building preview.
  • You can easily get the coordination of all the key concepts of this software such as drafting, planning, designing etc. of any structure which is very complex in other software and hard to calculate by using any other method.
  • You can work on this simultaneously with your team because it provides a multiple-user facility which gives many benefits like time-saving, more efficient and qualitative work.
To perform these jobs through Revit software with excellence, it is must learn course from a good Institute which can give you the right guidance.

Revit Training in Delhi

There are various Revit training institutes which offer a wide range of job-oriented courses as per the latest industry standards and technology. Though most of the institutes are performing well in providing correct and best knowledge about this software, CAD Training Institute also focuses on the practical aspects of this application. It is one of the best institutes in Delhi for Revit Architecture, Structure and MEP.

Reasons to Join CAD Training Institute

By joining our center one can experience the current market trends and can achieve practical exposer. I know that only this statement is not enough to believe that we provide the best training so here I'm going to tell you the reasons to join us.

CAD Training Institute is a renowned Revit Institute in Delhi, which provides high-quality training with a unique teaching methodology. It is one of the best training centers in Delhi which is contributing well to develop the scope of this software.

The institute has designed its courses according to the industry requirements which will help you in developing a 3D Modelling software. We provide you the advanced training with live projects, special guest lectures, and workshops.

All these things will help you out in designing figure. We help our students to develop competent technical proficiency and focus on handling real-time projects. One can gain good knowledge by learning through real and valuable world experience for creating digital drawings, 3D models, sections, and details. Without specialized training, one cannot achieve perfection in any field. So to achieve the perfection in Revit join our courses.

Revit Courses offered by Our Training Institute

Revit Master Course
Duration- 3Months
It is a course of 3 months duration which cover different topics of  Revit Architecture, Structure and MEP. Individuals will learn to create practical models, importing structural & compositional detail from different models, designing frameworks, and much more. Apart from this, in-depth learning is provided to students for practical exposure through continuous activities of tasks, class assignments and projects.

For full course details please check Revit Master Course

Revit Architecture Course
Duration- 1.5 Months
It is a short-term training course on Architecture by CTI. One will learn to design walls, windows, entryways, and roofs. This course familiarizes participants with different software features related to architectural design and construction.

For full course details please check Revit Architecture Course

Revit Structure Course
Duration- 1.5 Months
It is a short-term certificate course spread over a period of 1½ month. This course helps the learners through software’s user interface and structural modeling tools required for analyzing, creating, modifying, and documenting the model.

For full course details please check Revit Structure Course

These courses are very much beneficial for engineering students, architects etc for building a solid foundation for their projects. CTI team ensures that one can start learning this powerful 3D modeling software with ease so that all your training related requirements will get fulfilled.

Who can Join Revit Courses
  • Anyone, who is a beginner or has prior working knowledge related to past building, structural engineering or drafting foundation.
  • There is no previous experience required for this training, but having a working knowledge of architectural design, drafting and other engineering experience will be highly recommended.
I think you get all the answers to your questions, if still have any doubt then go through our advanced architect interior designing courses in and contact us on 9911782350.

Tuesday, February 20, 2018

Which command use to create 2D plan in AutoCAD


Autocad is the construction software in which we can make any design related to different fields like civil, Architecture, mechanical and electrical.

So, through this blog, you'll get to know about the important tools and commands in AutoCAD which are necessary to create 2d plans and which one should learn during their AutoCAD training from any institute in Delhi.

So, let's start from panels in AutoCAD.
Types of Panel
  1. Drawing panel
  2. Modify panel
  3. Layer panel
Drawing panel
The panel which is used to create all types of drawing is known as drawing panel.
Like:- 
  • Line
  • Polyline
  • Hatch
  • Circle
  • Rectangle
  • Polygon
  • Break command
Modify panel
The panel which is used to do the changing into the diagram is known as modify panel.
Like:-
  • Array
  • Erase
  • Copy
  • Mirror
  • Move
  • Rotate
  • Offset
  • Trim
  • Chamfer
  • Fillet
  • Joint
  • Scale
Layer panel
There are lots of important panels to work with the layer in AutoCAD. When we have to get a print of any design and we don't want to show any object from it then go to the layer panel and click on the print off after that, that object will not be print. It is used to show & hide the diagram of any plan.

Short key- LA Enter
Process:-
  • LA enter
  • click on the new layer
  • write the first name of the layer
  • choose the color
  • choose the line type
  • click on ok
  • apply
  • ok
  • Enter.
There are main seven tools or commands in the drawing panel. Here I'm explaining each one by one.

Drawing panel
Line:-
Short key- L enter
By this command, we can create the line from point to point. It means we can create straight and zigzag lines.


Process:- 
  • E enter
  • click on the first point on the screen
  • define the direction
  • provide the distance
  • Press enter
  • By ortho (f8) zigzag lines will convert into straight.
Polyline:-
Short key- PL Enter
It is used to create the line in which polyline created with each other.

Process:-
  • PL enter
  • click on the first point
  • Again click on the second point-------last point.
  • Enter. 
Hatch:-
Short key- H Enter
It is used to show the 2D design in any part of the design.

Process:-
  • H enter
  • select of any type hatch
  • Define the distance, angle.
  • Add the pick point.
Circle:-
Short key- C Enter
By this command, we can create the rounded shape on the base of the radius.

Process:-
  • C enter
  • Click on the first point
  • Drag the mouse
  • R enter
  • provide the radius
  • Enter.
Rectangle:-
Short key: - REC Enter
A figure which has four sides and every side is situated at 90-degree angle.

Process:- 
  • Click on rectangle command
  • Click any first point on screen
  • Define the distance
  • Enter   
Polygon:-
Short key- POL Enter
By this command, we can create the diagram of the base of the number.

Process:-
  • Make a circle
  • POL enter
  • The side of number
  • Click the center point of the circle
  • Enter an option inscribed in circumscribed about the circle.
Break command:-
Short key- BR Enter
The selected provide the distance, by this command we can break any line from the base.

Process:-
  • BR enter
  • Select the first line
  • Again click the second line
  • Press enter.
Modify Panel commands
There are total 12 commands in Modify panel. Here I'm giving a brief intro about each command.

Array:-
Short key- AR enter
With this command, we can create the multiple parts of the selected object around the center point.

Process:-
  • AR enter
  • Choose the polar array or rectangular array
  • View the number of objects
  • Select object
  • Right click
  • Pick the center point
  • Press ok.
Erase:-
Short key- E enter
By this command, we can delete the selected object.

Process:-
  • E enter
  • Select the diagram
  • Right click
Copy:-
Short key- CO Enter
Its take the image of selected matter and ripples of multiple places.

Process:-
  • CO enter
  • Select the object
  • Right click
  • Drag the mouse
  • Enter.
Mirror:-
Short key- MI Enter
It can create the mirror image of the selected object.

Process:-
  • MI enter
  • Select the object
  • Right click
  • Click on the first point
  • Again click on the second point
  • Press enter.
Move:-
Short key- M Enter
By this command, we can change the position of the drawing.

Process:-
  • M enter
  • Select object
  • Right click
  • Like on any point of the diagram
  • And again click are any point of the screen.
Rotate:-
Short key- RO Enter
By this command, we can change the direction of the diagram.

Process:-
  • RO enter
  • Select the diagram
  • Right click
  • Click on any point of the diagram
  • Rotate the mouse
  • Press enter.
Offset:-
Short key- O Enter
It creates the same matter on the base of the selected object.

Process:-
  • O enter
  • Provide the distance
  • Click on the line
  • Again click on out of line
Trim:-
Short key- TR Enter
With this command, we can cut any excess line of the drawing.

Process:-
  • TR enter
  • Select the object
  • Press enter.
Chamfer:-
Short key- CHA Enter
This command is used to cut any corner of rectangle or square on the basis of distance.

Process:-
  • CHA enter
  • D enter
  • Define the first distance
  • Again define the second distance
  • Enter
  • Click on the first line
  • Again click on the second line.
Fillet:-
Short key- F Enter
It is used to cut any corner according to the radios distance.

Process:-
  • F enter
  • R enter
  • Define the distance
  • Select the first point and second point
  • Enter.
Joint:-
Short key- J Enter
It is used to joint any line from one point to another point.

Process:-
  • J enter
  • Select the first line
  • Then the second line
  • Right click.
Scale:-
Short key- SC enter
By this command, we can increase or decrease the size of the diagram.

Process:-
  • SC enter
  • Select the object
  • Right click
  • Specify base point
  • Type the value
  • Enter. 
When creating the 2D plan we use some toggle key setting about which is given below.
Toggle key
This is used to on and off the function of any diagram.
SNAP (F9):- By snap we can maintain the distance between x spacing and y spacing.
GRID (F7):- It is used to show the dotted line over on the display.
ORTHO (F8):- It creates complete straight lines without any 
twist and turns in line.
POLAR (F10):- By polar tracking you can define the angle.


OTRACK (F11):- It is used for selecting endpoint, midpoint, center, node etc.


This blog is about the all popular command which one should know to create 2D plans in AutoCAD.  These drafts or drawing are used for Architecture, interior design, civil, mechanical and electrical designing. Above commands are very useful for all drafting professions in their work.

About Author
Hello, My name is Pritee Maurya. I am pursuing Architect Interior Master Course at AutoCAD Training Institute in Delhi. So, as we have seen on this blog that one should have good knowledge of commands and tools in AutoCAD to create complete 2d and 3d drawings. To read more AutoCAD blogs go visit our AutoCAD blogs page.

Thanks for reading this blog.

Wednesday, January 17, 2018

Use of Gradient Tool in Adobe Photoshop


Hi, my name is Nirma Maurya, I have joined this institute for my Architecture and Interior Designing Training here. I was given this topic to express my views, hope you will like.

Photoshop is an image editing software maintained by Adobe and was launched in the year 1988. Photoshop is considered to be the leader among image editing software and it has gained immense popularity. 


The software allows you to do basic to advanced level changes like tweaking brightness, colors, removing a person from an image etc. You can use Photoshop on images taken by any source including mobile phones, DSLR camera, and even old film cameras. To use Photoshop with reel cameras requires a bit extra work.

TOOLS AVAILABLE IN PHOTOSHOP
There are different types of tools available in Photoshop which are broadly categorized into:
  • Drawing tools
  • Painting tools
  • Measuring and Navigation tools
  • Selection tools
  • Typing tools
  • Retouching tools

GRADIENT TOOL


The Gradient tool in Photoshop is very useful and can be used to quickly fill in areas as well as create backgrounds for websites. It allows you to create a blend of colors fading into one another on your image. It can be used to draw linear, radial, angular, reflected or diamond gradients.

DIFFERENT TYPES OF GRADIENT

I. Linear Gradient: -  The default gradient style in Photoshop is Linear, but you can select it manually if you need to by clicking the first icon on the left. It will be requiring two color selection in this gradient, it gives start color to end color an effect in the straight line.

II. Radial Gradient: - The Radial style (second icon from the left) will blend the colors and draw a circular gradient outward from your starting point.


III. Angle Gradient: - Much like the Radial style (third icon from the left), the Angle style also uses your starting point as the center of the gradient. But rather than transitioning outward in all directions, it wraps itself around the starting point in a counterclockwise fashion.


IV. Reflected Gradient: - The Reflected style (third icon from the left) is very similar to the standard linear style, but it goes a step further by taking everything on one side of your starting point and mirroring it on the other side


V. Diamond Gradient: - This gradient (fourth and last icon from left) will create transitions outward from your starting point, just like the Radial style, except that it creates a diamond shape:


 How to Use Gradient:

  • Let's start by creating a new Photoshop document. From File menu in the Menu Bar along the top of the screen and select New

Gradient Tool is available in the Tools panel along the left of the screen. I'll select it by clicking on its icon. You can also select the Gradient Tool simply by pressing the letter G on your keyboard:  

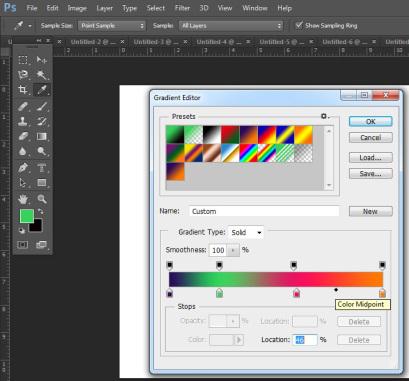
  • After that click to edit the gradient from Gradient Editor(From option bar)
  • Select the color of gradient
  • Click the first point and move your mouse in any direction to change the color. Click OK button and you will create a new gradient.

How to Make New Gradient:

  • Take a new page (control + N) 

  • Click on Gradient tool (from toolbar)

  • Click to edit the gradient (from option bar)
  • Select the gradient
  • Click on New
  • Change the color by clicking the color stop

  • Change the opacity
  • Move the color midpoint
  • Change the smoothness
  • Click on save.

How to Load Gradient:

  • Take a new page (control + N)

  • Click on gradient tool (G)

  • Click to open the gradient for editing (from option bar)

  • Open Google
  • Free download PSD gradient
  • Make a folder on desktop
  • Save these gradient in folder
  • Open Photoshop
  • Select the gradient tool and click on load
  • Gradient will be loaded and will appear in Gradient Editor.
  • You can use the newly loaded gradient.
A gradient is an effect created in which one color, shade, or level of brightness fades into another. If gradients are already prepared and added to gradients panel will help in speeding up your design process.You will have the provision to create your own gradients, and also use a library of presets can be an effective tool. 

Photoshop is used by a variety of creative professionals in a variety of ways. It’s all about understanding how to use the software tools to achieve your desired effect. 

You can create successful presentations and develop your design projects to a professional standard by using both CAD software and Photoshop together. This is why it is of utmost importance that individuals who are interested in doing interior designing must join Photoshop Course for CAD Professionals

Learning this application from Best Photoshop Training Institute Delhi can help you Rendered Visuals, Floor plans, Elevations and Section drawings produced either by hand or by a different CAD software such as SketchUp.

Which is the best institute for AutoCAD electrical course in New Delhi?

Are you curious to know how electronic devices work? There are many people who enjoy working with electronic equipment. However, they do not...